
Why and How to Wire and Tape Flowers
If glue is great, why would you ever wire and tape flowers?
Because wiring and taping individual flowers for corsages, boutonnieres or bouquets excels in certain applications. Hand-wiring, unlike Myspace and super low-rise pants, might always be with us.
There are weak, brittle, crooked or too-short stems. There are flowers with heavy heads. There are long designs, like the ultra-long extension of a cathedral cascading bouquet. There is clustering delicate stems.

There’s also control. You can get wired and taped flowers into positions you can’t with unwired stems. They’ll likely stay there, too. The bridal party might get out of line, but not your bouquet flowers.
And you might just prefer to wire and tape floral designs. Your design, your technique, your reasons.
What follows is a comprehensive rundown on how to wire and tape flowers, from corkscrew to cranking to feathering to hairpin to cross-piercing to air-taping and more.
The basics of wiring flowers
To wire a flower, the stem is usually removed, leaving only the bloom. Wire replaces or supports the stem.
Florist wire is sold by gauge. The higher the gauge, the thinner the wire. You want to choose the thinnest wire possible for the flower weight to keep the form intact but light.
Gauges 24, 26 and 28 are popular for personal flower work. 24-gauge is good for roses and carnations and heavier flowers positioned closer to the binding point. 26 and 28 gauges are better for delicate and lightweight blooms on the outer perimeter of the design or inserted last as filler flowers.
Each step of wiring is covered by floral tape to hide the mechanics, give a more aesthetic look to the finished stem, help secure the wire to the flower and adhere the individual flowers together into one composition.
The choice of which wiring technique to use depends mostly on the size of bloom and the purpose of the design. For a sustainable option, OASIS® Forage Products™ forage wrap and wire provide a clean and sleek finish to foraged projects.
Basic Wiring Techniques
[rev_slider alias="wiring-taping-1"]A taped wire is bent into a loop and placed behind a bloom or leaf to offer support.
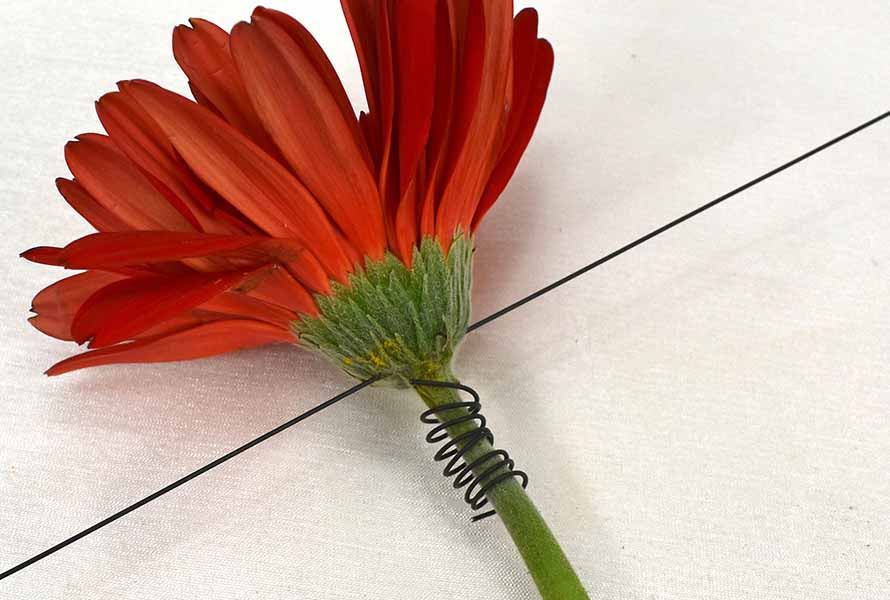
Corkscrew

A technique used to position the face of a flower with a rigid stem such as an orchid or a weak stem like a Gerbera Daisy. Insert a wire through the stem at the base of the bloom using the piercing method. Tightly coil a second wire around the stem leaving both ends free. Bend the first wire down over the spring-like coil and tape.
Cranking

The fastening of a wire tightly to an object. Bend the wire around the object. Cross the ends of the wire over and over, twisting them as tightly to the object as possible in a cranking motion. This method can be used to secure heavy materials for hanging. The wire can be taped or untaped.
Feathering

Another term for Frenching. Hold the flower head, such as a carnation, upside down. Cut the calyx and divide it into smaller sections such as a half, third or quarter. Each new segment should maintain a piece of the calyx.
Press the smaller section back into a rounded bloom similar to a miniature carnation. Tape the new flower from the top of the calyx to its base with floral tape. Using the wrapping, piercing or cross-piercing methods, secure the new flower with wire and finish it by taping.
Hairpin

Hairpin is bending wire in half to create a rounded U-shaped form that can be placed over a petal or inserted through a flower or foliage for support.
In the case of a phalaenopsis orchid, a thin wire should be taped with white tape in the center before bending. When it is pulled down over the narrow membrane in the center above the orchid’s throat with the wire extending down on either side, the white-taped wire won’t show as much and will be less likely to cut the membrane.
Align each side of the wire underneath the bloom and bend slightly to fit the angle of the flower. Wrap one end of the wire around the stem and the other wire and tape to secure it.
Hook
[rev_slider alias="wiring-taping-2"]A wire is placed up through a shortened stem, extended past the disc or dome-shaped flower head like a daisy or mum and bent into a small hook and pulled back down through the center of the flower. The wire is taped to the stem at the base of the bloom.
If inserting a hooked wire into the throat of a hyacinth or similar flower, the wire can be bent into the hook first, inserted from above, and taped where it emerges from the flower at the lower end.
Content continues below
Mechanics for Wiring and Taping
Insertion
Insert one end of a wire into the calyx of a flower and wind the wire down the length of the stem as a means of supporting long or weak stems. Tape to cover the wire but leave the section of the stem that will be placed in floral foam or water untaped.
Petalette

Roll a soft, flexible petal into a bud shape, use the wrapping method to secure it and tape the wired stem for a finished look.
Piercing

Insert a wire through the calyx of a flower, leaving an equal amount of wire extended on each side. Bend both ends of the wire downward against the stem and tape in place.
Cross-Piercing:
Use the same technique as piercing but use two wires to support heavier flower heads. Insert one wire horizontally through the calyx in one direction with both ends equally extended and another across it in the opposite direction. The wires will cross over each other in an imaginary X inside the calyx. Bend all four wires down beside the stem and tape.
Stitching

Stitching is another name for a sewing technique that is often used on foliages to create support. The florist wire is inserted from the leaf underside across the midrib of the leaf on the front and back down leaving a single stitch on the face side. Equal lengths of wire extend on either side of the rib underneath. The wire ends are then bent down on either side of the stem and taped in place.

Ornamentation can be added to a large leaf by stitching narrow decorative wire or other accent material in and out in a pattern on the leaf, so that a row of stitches can be seen.
Splinting
A stiff wire is inserted into the calyx of a weak stemmed flower and loosely spiraled around the stem to add support or to angle the bloom slightly for design purposes.
Cross-Piercing

Inserting a heavier wire, like an 18-guage, vertically up through a shortened stem and then piercing or cross-piercing the stem horizontally just beneath the bloom. Pull the wires down alongside the stem and tape.
Wrapping
[rev_slider alias="wiring-taping-3"]Cluster delicate stems into a bunch. Position one-half of a thin wire alongside the stems with an equal length of wire extending above the bloom. Bend the wire downward beneath the head of the bloom. Begin wrapping the remaining wire from the top downward encircling the stems and first segment of wire and tape.
Basic taping techniques
The second step of wiring and taping is to tape over the wired area using floral tape, a lightweight paper tape with a wax finish. This technique gives a wired stem or bouquet handle a clean and finished look.
Taping a wired stem

Gently pull on the tape as you encircle it and move it downward along a wired stem and it adheres to itself helping to secure the hold. If the tape isn’t stretched as it is wrapped the finish will be loose and will not hold the structure in place.
Some wiring techniques can also be used to support a flower on its stem in a fresh flower arrangement. In that case, the bottom section of the stems will not be taped so the flower stems can access the water.
Air-taping

Air-taping is wrapping or twisting floral tape around itself to suspend lightweight materials such as petals or small leaves without the aid of a wire.
What about gluing?
In recent years, gluing flowers into corsages, boutonnieres, etc. with floral adhesives has become a popular design technique, sometimes replacing wiring and taping. However, there are times when the strength and support of wiring and taping flowers is needed for the structure of a design.
You'll benefit from developing both gluing and wiring skills. Sometimes the best design solution is to use the two techniques together. Wiring the heaviest flowers to create the form of an intricate corsage and then gluing in the lightweight filler materials is a good example.
Experiment with the wiring and taping techniques illustrated above. Which wiring and taping technique do you use most often?
7 comments
Enjoy Sharon McGukin and the time she takes to show and teach us!
Tara Taylor
To get those fantastic adhesives properties, this is a solvent-based glue and does have an odor. As the labels advises, please use in a well-ventilated area.
Jacque SirLouis
Wendy
Stacey Markuten
Mary S Lopez
Deb
smsdes
Leave a comment
This site is protected by hCaptcha and the hCaptcha Privacy Policy and Terms of Service apply.