
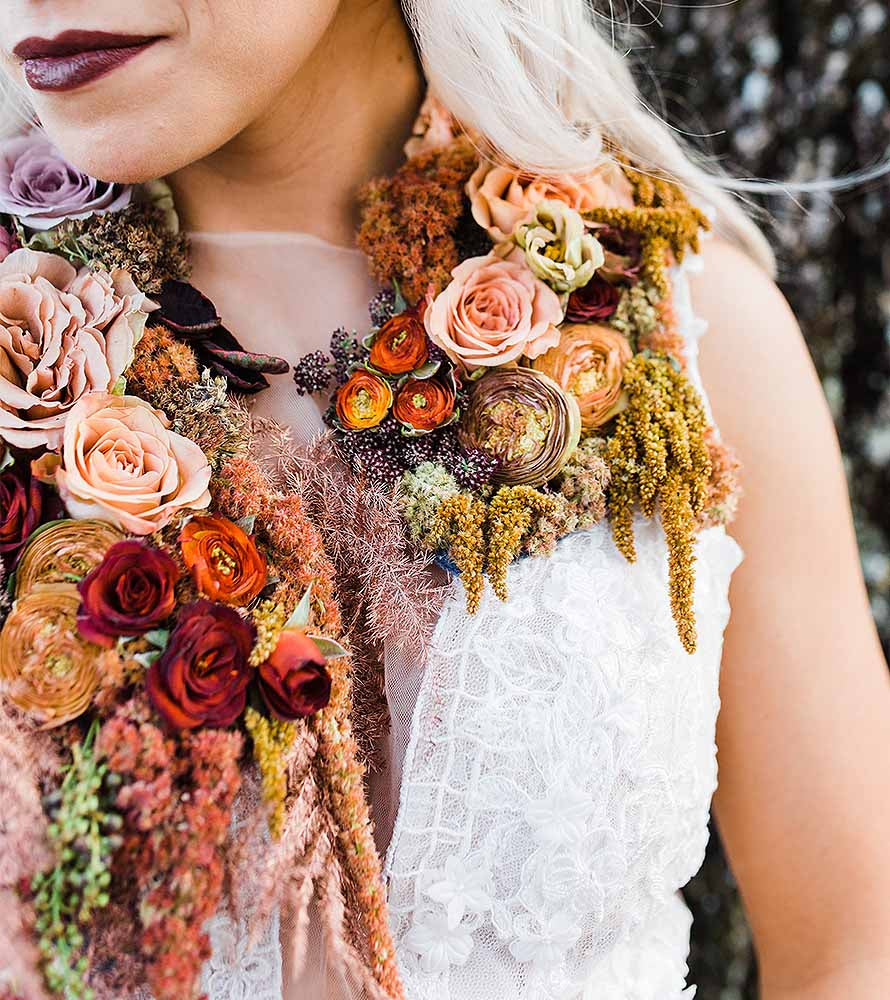
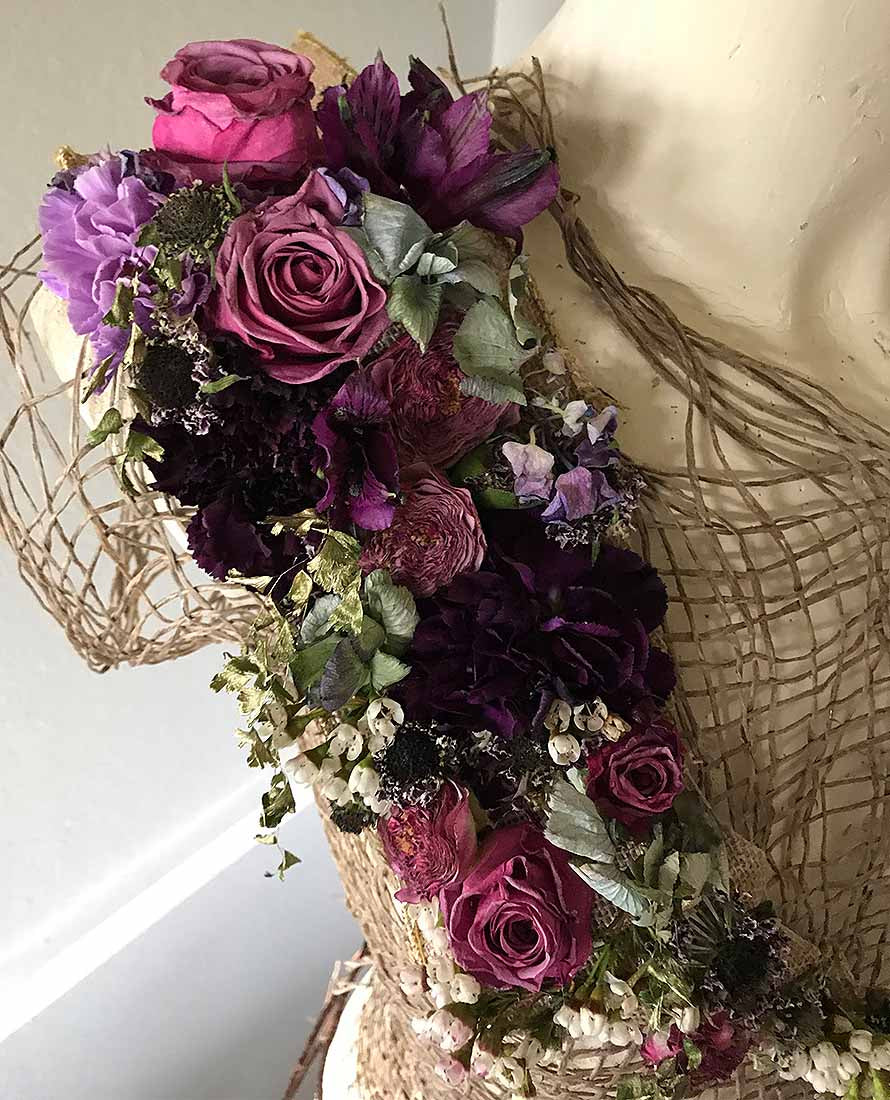
There’s botanical couture designed for shows. Then there are these 13 stunning floral scarves, vests and bodices that people will love to wear.
Offering wearable floral couture like these designs can set your floral business apart. Or, like Carol Jillian of
Jillian Design Botanical Couture in Lakeway, Texas, you can make it your business.
“Everything I create is meant to be worn,” Carol explains. Customers wear them “for a wedding, prom, special event, evening wear or as a decorative element.”
Carol offers seven key insights for creating floral upperwear, including intricate details on how to fashion the foundation, which glue to use, the right felt and how to place deconstructed flowers.
She begins with this: “A design should never be more powerful than the person wearing it.”
Read on for her botanical couture design steps along with techniques she’s learned along the way.
Inspiration from dance

Carol’s passion for floral fashion began with a life-long love of botanicals.
“My inspiration often comes from fashion and dancers and is influenced by my past, which is laced with Japanese and German history.”
She’s discovered people who are open to wearing botanical couture are very visual. Which makes it no surprise that showing the work is the best way to encourage customers, especially brides, to choose wearable botanicals for their wedding day.
It’s like wearing your bouquet

“This is a different look for brides,” Carol says. “It combines the neck and décolletage down to the bridal bouquet. It’s like wearing your bouquet.”
“Flowers and botanicals should complement both the person and the florals,” she explains. “I begin the design construction with my subject in mind.
To create her style of floral scarves, vests and bodices Carol offers these suggestions:
1. Use heavy duty construction felt

Carol has discovered it’s essential to cut the foundation pattern from heavy duty felt. She prefers a firm gray construction felt that she finds at Joann’s.
Floral adhesive absorbs more easily into this particular felt, creating a stronger bond to hold flowers more securely in place.
The gray felt even has a better holding quality than the other colors. Carol tried white for a wedding but it wasn’t as sturdy. She adds that floral artist Francoise Weeks agrees with her.
“Allow the fabric to drape over the shoulders and down the décolletage in the form you intend to design,” she instructs. You can do this on a flat surface but working on a seamstress mannequin is usually easier.
Once your design is finished, you can reshape the felt by cutting away any excess fabric along the edge of the flowers. Having experimented with different shears, Carol finds the strength of Oasis
serrated floral scissors crucial for this step.
2. Create a focal point of flowers first

To create a cohesive look, start by creating a focal point on each side of the design, then allow the flowers to flow from these areas. This produces a soft flowing appearance to the design.
Carol often uses the ancient grain amaranths to add the length or soft texture that gives this visual flow to the structure.
Sometimes Carol uses
bind wire to create a loosely woven part of a floral scarf or the lines of a vest, etc.
3. Don’t hesitate to deconstruct flowers
Hold a rose head tightly by its petals, cut off the calyx and liberally glue the base of the bunched petals. Then hold them to the felt for a few moments to glue the flower in place.
Using a
floral knife, cut some flowers shorter and others longer to gain different height and size from the same variety. This allows clustering like-flowers together for more visual depth.

4. Gluing is the biggest challenge
For this challenging gluing application, use the plastic bottle that comes with a can of
floral adhesive rather than a metal tube of glue. The flexible plastic makes all the difference.
“The plastic bottle is so much more responsive than the metal tubes,” Carol advises.

Apply the adhesive generously to the base of each flower. Press it to the felt and hold for a few seconds until it sets.
“This is my paintbrush,” explains Carol. “I rub the tip of the glue bottle with Vaseline. Then I am forever wiping the tip with a cloth to keep it clean.”
Keep the glue bottle full to prevent air bubbles. This allows the adhesive to dribble out in a steady stream you can direct with ease.
5. Keep your hands clean!
Start with a little petroleum jelly on each fingertip to prevent adhesive from sticking to your hands.
“I am constantly washing the tip of the applicator and my hands,” Carol says. “If your fingers or glue tip aren’t clean you’re more likely to touch and damage the flowers.” Otherwise, you run the risk of accidentally tearing individual petals, causing deconstructed flowers to fall apart or leaving traces of glue on the materials.

Carol says that she has tried all types of products for removing adhesive from her hands but finds that nothing works better than lukewarm to hot water.
6. Keep a water-misting bottle handy
Carol frequently mists the designs with water while designing, before and after refrigeration and during the photo shoot.
Spraying water constantly from a spray bottle keeps the flowers fresh and vibrant. She uses no other finishing sprays before photography. She finds water hydrates better for a fresher appearance.
“At the end, before I hand the design over to a client, I will spray it with an anti-transpirant like
Finishing Touch,” she says.
How does Carol select her flowers?
The flowers Carol chooses depend on the season, event and person wearing them.
“Silver Tree is my favorite fresh material when I can find it.” she says. “I love the plant’s one of a kind hue and texture.”

Another favorite is the ‘magical’ rose. Roses combine beautifully with other floral textures and leaves. They are available in so many colors, sizes and petal count and are available year around.
Carol enjoys using the velvety side of a magnolia leaf for its camel color and texture. “No other material has quite the same feel of suede.”
She loves the pliable and durable quality of green aspidistra, which is available year round and the colorful croton leaf.

She finds carnations versatile and easy to work with in her compositions. “Carnations come in extravagant colors and are hardy to work with.”
Influenced by Francoise
How did Carol get started in botanical couture?

In 2016, she attended the
Floral Design Institute in Portland Oregon for certification as a Wedding Floral Specialist. While there, she was inspired by botanical artist
Francoise Weeks.
See a collection of Francoise designs in this blog
4 Easy Steps for Creating Trend-Savvy Botanical Headpieces.

“Since then, I have devoted my time to perfecting the artform of creating wearable floral and botanical couture,” says Carol.
She works only with freshly cut leaves, flowers and succulents to create designs that accentuate the human form.

“To express body and spirit through floral and botanical textures is a never-ending journey for me,” Carol explains.
“Why wouldn’t you want to wear beautiful leaves and petals?” she asks.
Word of mouth is always the best salesperson
“After a party I’ll often get a call from a potential customer who’s interested in designs they saw others wearing.”
Social media is today’s digital version of word of mouth.
“I couldn’t have this job without people seeing my photos on social media,” she says.
Carol shares wedding images on her
@stardustinherhair Instagram page.
For more floral and botanical couture ideas visit
Carol’s Instagram page.
What are your ideas for introducing botanical couture to your clientele this year?
Which styles of floral fashion appeal most to you?

2 comments
ikulerusi
etudejiqyija
Leave a comment
This site is protected by hCaptcha and the hCaptcha Privacy Policy and Terms of Service apply.